
A production ready web mapping toolkit - Part 3
This is the third in a series of posts aimed at developing a set of containers that can be quickly deployed to enable web mapping in a production environment. The previous articles dealt with
Up until now, we’ve been using the django webserver which is most definitely not production ready. In this installment, we’ll deal with serving our application through nginx, encryption, and the issues of hiding important password and configuration data by saving them in environment variables that are not under source code control. The rationale and methods we are following are laid out in the book Two Scoops of Django and discussed here and here.
Set Up The Environment
If you recall from the previous posts, we used cookiecutter to configure a django/postgres web server running in docker containers. The cookiecutter script helpfully creates two docker-compose recipes, one for development (dev.yml) and one for production (docker-compose.yml). Comparing the two recipe files, we can see that the production version differs from the dev version in that it adds containers for nginx, redis and certbot, plus all of the environment variables passed to each container are now referenced in a non-tracked file called .env.
What’s a production website? Well, one key feature of a production site is that it has a domain name. In fact, some of the stuff I’ll be discussing in this section won’t work without a domain name, such as LetsEncrypt! This makes sense I suppose, but if you are not in control of a web domain (meaning you can edit the DNS entries and create A records) you may have problems adapting some of what follows to your particular situation. You can get a domain name fairly cheaply from godaddy or similar services.
We begin by copying the file env.example to .env
$ cp env.example .env
Now we have a file that doesn’t show up in directory listings (try ls -a) and is excluded from source control as it is specifically included in the .gitignore file. If you are using WinSCP as an editor, you will need to select Preferences - Panels - Show hidden files to see the new file. The file will look something like this:
# .env
# PostgreSQL
POSTGRES_PASSWORD=mysecretpass
POSTGRES_USER=postgresuser

# General settings
DJANGO_ADMIN_URL=
DJANGO_SETTINGS_MODULE=config.settings.production
DJANGO_SECRET_KEY=q)%1&0qsr#!mfg5^k@+4i1v*nj0&3f5&(0kf-)&&1g*z6+jxqn
DJANGO_ALLOWED_HOSTS=*

# AWS Settings
DJANGO_AWS_ACCESS_KEY_ID=
DJANGO_AWS_SECRET_ACCESS_KEY=
DJANGO_AWS_STORAGE_BUCKET_NAME=

# Used with email
DJANGO_MAILGUN_API_KEY=
DJANGO_SERVER_EMAIL=
MAILGUN_SENDER_DOMAIN=

# Security! Better to use DNS for this task, but you can use redirect
DJANGO_SECURE_SSL_REDIRECT=False

# django-allauth
DJANGO_ACCOUNT_ALLOW_REGISTRATION=True
# Sentry
DJANGO_SENTRY_DSN=
Cookiecutter-django comes configured ready to use a number of services that you might want, including:
- Amazon S3 for serving static content
- Mailgun for sending/recieving/filtering emails
- Sentry for error tracking and reporting
These all look like good options, but we don’t need them for our basic example. We really only need to ensure the database and general settings are configured.
Change the PostgreSQL Variables
As with the development system, we need to set the name of the DB and the allowed hosts.
Select A Django Admin URL
Since the admin interface has so much power, we want to keep hackers from getting into it. One trick is to use a url other than the default /admin. This entry must be filled in or the admin site won’t be accessible online, even if you enable it in django.
Change The Secret Key
The most important thing to do is change the secret key and put a copy of it someplace safe. You can type random stuff in there or use this handy little script to generate a secret key on the command line:
$ function mk_dj_secret() { python -c "import random,string;print 'DJANGO_SECRET_KEY=%s'%''.join([random.SystemRandom().choice(\"{}{}{}\".format(string.ascii_letters, string.digits, string.punctuation)) for i in range(63)])" ;}
Then just call mk_dj_secret and copy/paste the resulting text.
dave@django-base:~/cc_demo/cookie_cutter_demo$ mk_dj_secret
DJANGO_SECRET_KEY=ICNXnJa@%QgP1yj[wqkqJF/VG*9K9?!Vv77=?"pZdW/<tp,4mxn[KlFMjzw|<fS
Change the Allowed Hosts
Also important, this is a security feature to prevent host header attacks. As always, once you start using tools at a professional level, eventually you will have to RTFM.
In my case, I’ll use a host name of dev.positionbot.com. This will work because I have created an A record for that URL using the DNS manager on Digital Ocean. Here is a tutorial on how to do that.
Here is the relevant part of my .env file:
# .env
# PostgreSQL
POSTGRES_PASSWORD=docker
POSTGRES_USER=docker
POSTGRES_DB=gis
ALLOW_IP_RANGE=172.18.0.0/16

# General settings
DJANGO_ADMIN_URL=geo_admin
DJANGO_SETTINGS_MODULE=config.settings.production
DJANGO_SECRET_KEY=q)%1&0qsr#!mfg5^k@+4i1v*nj0&3f5&(0kf-)&&1g*z6+jxqn
DJANGO_ALLOWED_HOSTS=dev.positionbot.com
Create A dhparms.pem File
Certbot, the service that gets SSL certificates from LetsEncrypt!, requires a Diffey-Hellman key to be generated before we can request certs. We use openssl to generate one:
$ openssl dhparam -out /home/dave/cc_demo/cookie_cutter_demo/compose/nginx/dhparams.pem 2048
A Few Other Things…
Correct the database URL passed to django
In the last post, we edited the file compose/django/entrypoint.sh to get django to load the PostGIS driver rather than the Psycopg driver. As it turns out, I missed one change where the DATABASE_URL is defined. Here is what that line should look like:
# compose/django/entrypoint.sh
# ...

export DATABASE_URL=postgis://$POSTGRES_USER:$POSTGRES_PASSWORD@postgres:5432/$POSTGRES_DB

# ...
This stuff is referenced in the dj-database-url app which is used to decode these things. Note that this method is one of the practices discussed at 12factor, which provides some good guidelines for building secure services.
Check docker-compose.yml
The production recipe is more complex than the development version, here is what it looks like:
# docker-compose.yml
postgres_backup: {}

services:
  postgres:
    build: ./compose/docker-postgis
    volumes:
      - postgres_data:/var/lib/postgresql/data
      - postgres_backup:/backups
    env_file: .env

  django:
    build:
      context: .
      dockerfile: ./compose/django/Dockerfile
    user: django
    depends_on:
      - postgres
      - redis
    command: /gunicorn.sh
    env_file: .env

  nginx:
    build: ./compose/nginx
    depends_on:
      - django
      - certbot

    ports:
      - "0.0.0.0:80:80"

    environment:
      - MY_DOMAIN_NAME=dev.positionbot.com
    ports:
      - "0.0.0.0:80:80"
      - "0.0.0.0:443:443"
    volumes:
      - /etc/letsencrypt:/etc/letsencrypt
      - /var/lib/letsencrypt:/var/lib/letsencrypt

  certbot:
    image: quay.io/letsencrypt/letsencrypt
    command: bash -c "sleep 6 && certbot certonly -n --standalone -d dev.positionbot.com --text --agree-tos --staging --email dcurrie@geoanalytic.com --server https://acme-v01.api.letsencrypt.org/directory --rsa-key-size 4096 --verbose --keep-until-expiring --standalone-supported-challenges http-01"
    entrypoint: ""
    volumes:
      - /etc/letsencrypt:/etc/letsencrypt
      - /var/lib/letsencrypt:/var/lib/letsencrypt
    ports:
      - "80"
      - "443"
    environment:
      - TERM=xterm


  redis:
    image: redis:latest
Note the changes that I made:
- In the postgres section, the build command references
docker-postgis - In the nginx section, MY_DOMAIN_NAME is set to my web domain which I set up using DigtalOceans DNS
- The certbot command has been edited in three places:
- -d dev.positionbot.com
- –staging flag added to use the staging server which has higher limits
- –email has my email address
Get A Local Copy Of OpenLayers And Use It
Here’s a handy bit of hard won knowledge: GeoDjango loads the OpenLayers javascript library from the openlayers.org site, which will raise an error when we run our site with SSL, since the openlayers.org site is HTTP only. There is a simple fix for this, we will serve the widget from our site. But first we have to download and install OpenLayers in the static folder of our main project so that the collectstatic command will find it later:
$ cd /home/dave/cc_demo
$ wget https://github.com/openlayers/ol2/releases/download/release-2.13.1/OpenLayers-2.13.1.tar.gz
$ tar -xvf OpenLayers-2.13.1.tar.gz
$ cp OpenLayers-2.13.1/OpenLayers.js cookie_cutter_demo/cookie_cutter_demo/static/js/OpenLayers.js
$ mkdir cookie_cutter_demo/cookie_cutter_demo/static/js/img
$ cp -r OpenLayers-2.13.1/img/* cookie_cutter_demo/cookie_cutter_demo/static/js/img
$ mkdir cookie_cutter_demo/cookie_cutter_demo/static/js/theme
$ cp -r OpenLayers-2.13.1/theme/* cookie_cutter_demo/cookie_cutter_demo/static/js/theme
Now, when we use one of the admin tools supplied in django.contrib.gis we need to subclass the tool and override the openlayers_url property. So far, we only reference this in one place, our geodata/admin.py file. Edit it to look like this:
# geodata/admin.py

from django.contrib.gis import admin

# Register your models here.

from .models import Location

class olGeoModelAdmin(admin.GeoModelAdmin):
    openlayers_url = 'OpenLayers.js'

admin.site.register(Location, olGeoModelAdmin)
All the above is a bit of a pain, and I am inclined to dump the whole OpenLayers thing and switch to django-leaflet and use its admin widgets. However we’re almost there so we can leave that for later.
Build and Run The Production Containers
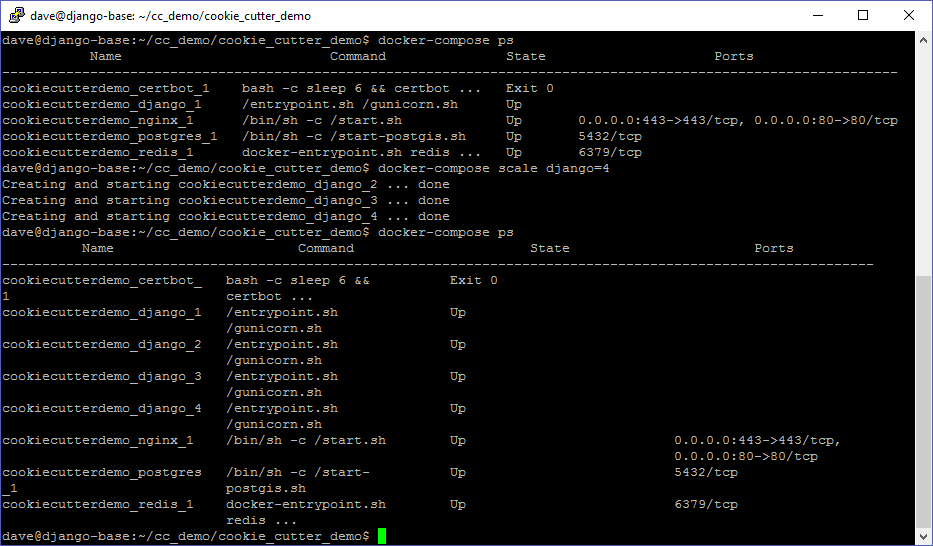
If we did everything right, we can now go through the docker-compose and django management steps again:
$ docker-compose build
$ docker-compose up -d
$ docker-compose ps
$ docker-compose run django python manage.py makemigrations
$ docker-compose run django python manage.py migrate
$ docker-compose run django python manage.py collectstatic
$ docker-compose run django python manage.py createsuperuser
Note that we have to perform the collectstatic and createsuperuser tasks again, since the last time we stopped the development server, we used the command docker-compose -f dev.yml down which should stop and remove all containers. If you get an error trying to bring up the new session, try using this command:
$ docker-compose -f dev.yml rm postgres
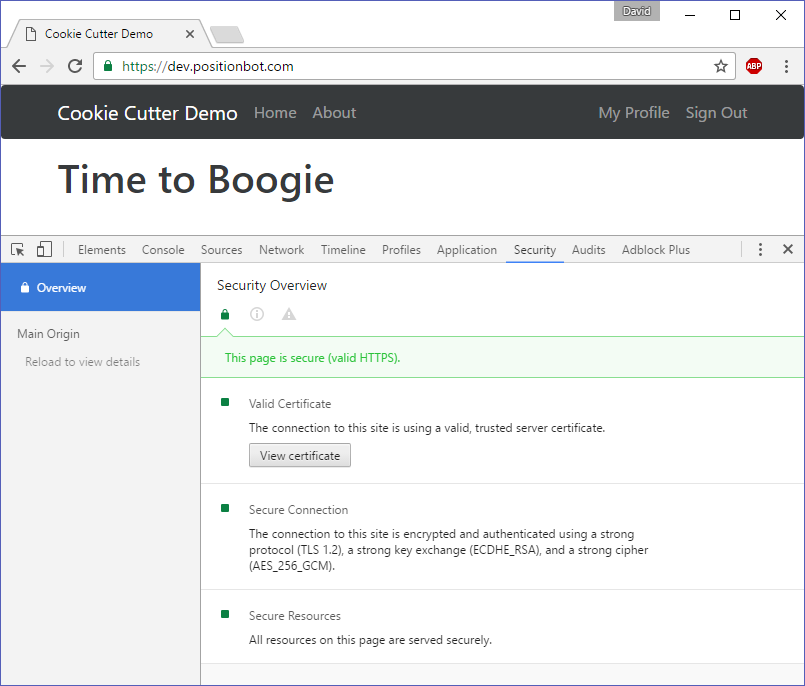
Navigating to http://dev.positionbot.com shows that our server is redirecting us to the HTTPS port and returning secure pages.
And we have the admin site available at the new url:
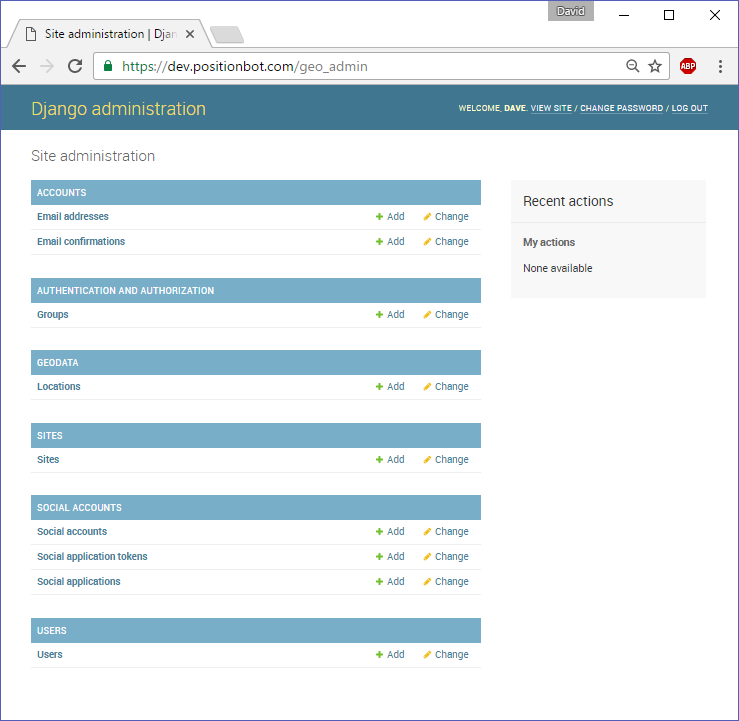
If we try to go to http://dev.positionbot.com/admin we get a 404 Page Not Found. One clever idea that could be added here is an admin honeypot, which serves a fake admin login page and records the IPs of potential hackers that attempt to login.
Scaling Up
One benefit of the configuration we are using is the ability to easily scale our application. For example, we can add additional django containers if we get a lot of requests that are slow to respond.
Of course, if we expect to have a lot of traffic on our site, it would make sense to use celery to handle the message queue as well.
Cleaning Up
Now that we know we can quickly bring up our secure site with all the geo stuff intact, we can start thinking about what can be done with the tools at our disposal and how to deploy them. Some things to consider:
- Using Mailgun - if we want our site to send emails
- Using Amazon S3 for static content, especially large files
- Using Sentry for error reporting
In future posts I will start building out some geo apps with django, put a leaflet map on the main page, and discuss serving geojson. Stay tuned.